In ASP.Net, it is possible to create re-usable code. The re-usable code can be used in many places without having the need to write the code again.
The re-usable code helps in reducing the amount of time spent by the developer after writing the code. It can be done once and reused at multiple places.
In this tutorial, you will learn-
- Create User Control in ASP.Net
- Registering User Controls on a ASP.NET web forms
- Registering asp.net controls globally in the web config configuration file asp
- Adding public properties to a web control
Create User Control in ASP.Net
ASP.Net has the ability to create Web controls. These controls contain code which can be re-used. It can be used across application as per the requirement.
Let’s take a look at an example of how we can create a web user control in ASP.Net
In our example,
- We are going to create a web control.
- It will be used to create a header component.
- It will contain the below mentioned text.”Guru99 Tutorials”This Tutorial is for ASP.Net”
Let’s work with our current web application created in the earlier sections. Let’s follow the below steps to create a Web user control.
Step 1) The first step is to create a web user control and add it to our Visual Studio Solution.
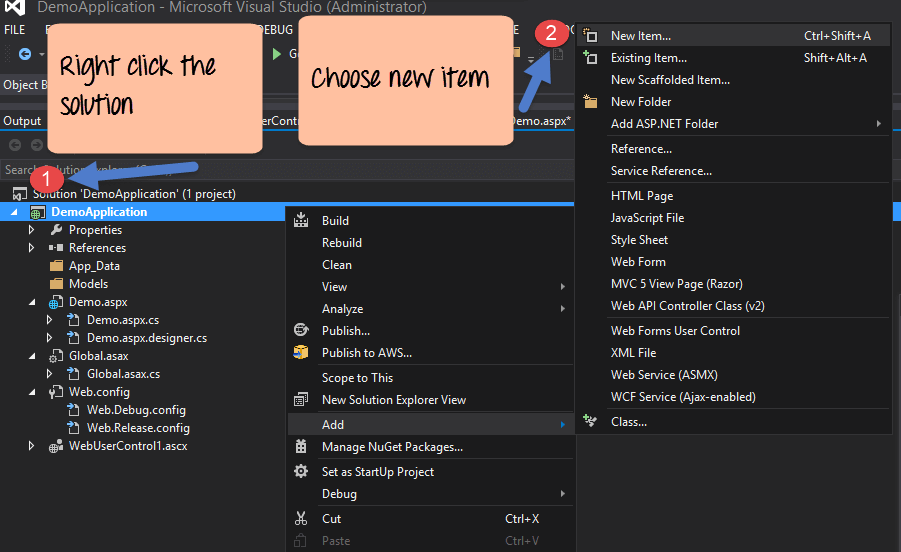
- Go to the Solution Explorer in Visual Studio and right click the DemoApplication Solution
- Choose the menu item Add->New Item
Step 2) In the next step, we need to choose the option of creating a web user control
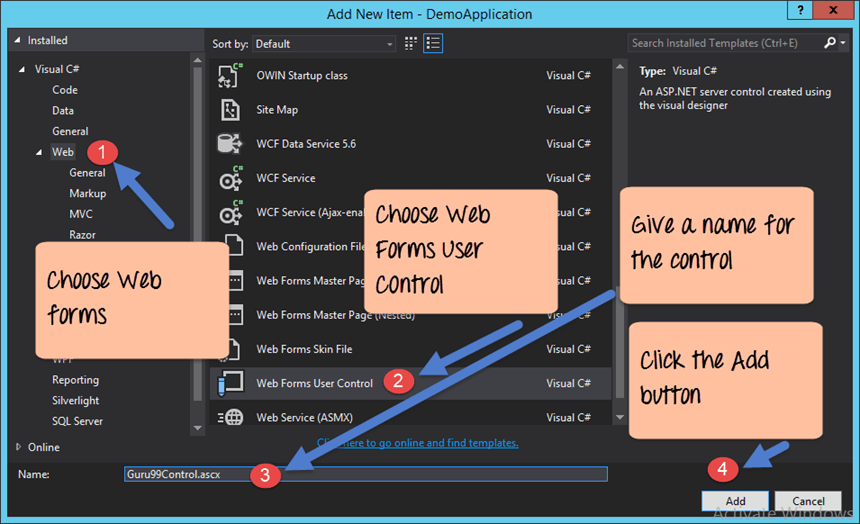
- In the project dialog box, we can see various options for creating different types of components. Click the “Web” option on the left-hand side.
- When we click the “Web” option, you see an option for “Web Forms User control.” Click this option.
- We then give a name for the Web Control “Guru99Control”.
- Finally, click the ‘Add’ button to let Visual Studio add the web user control to our solution.
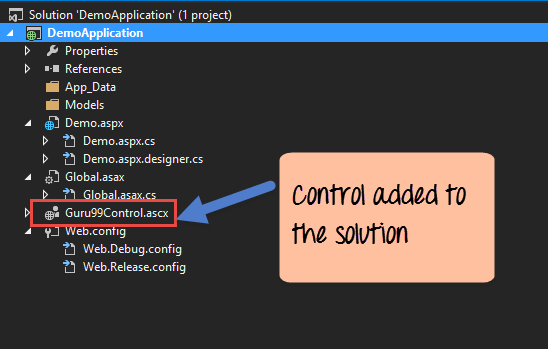
You will the see the “Guru99Control” added to the solution.
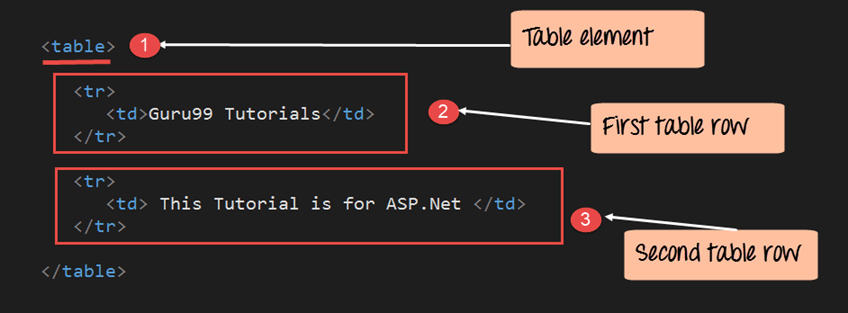
Step 4) Now it’s time to add the custom code to the Web user control. Our code will be based on pure HTML syntax. Add the following code to the ‘Guru99Control.ascx’ file
<table>
	<tr>
	  <td>Guru99 Tutorials</td>
	</tr>

	<tr>
	  <td> This Tutorial is for</td>
	</tr>
</table>
Code Explanation:-
- In our Web Control file, we are first creating a table element. This will be used to hold 2 rows of text which will be used to display
- “Guru99 Tutorials” and
- “This Tutorial is for ASP.Net.”
- Next, we define our first table row and put the text as “Guru99 Tutorials.”
- We then define our second table row and put the text as “This Tutorial is for ASP.Net.”
NOTE: Now we cannot execute this code and show the output. The only way to see if this works is to include it in our application (aspx file). We will see this in the sub-sequent topic.
Registering User Controls on a ASP.NET web forms
In the earlier section, we saw how we can create a custom web control. This can be used to display the following two lines in a web form
- “Guru99 Tutorials”
- “This Tutorial is for ASP.Net.”
Once the custom ‘control’ is created, we need to use it in our web application. The first step is to register the component in our application (Demo.aspx). This is the pre-requisite to use in any custom web control in an ASP.Net application.
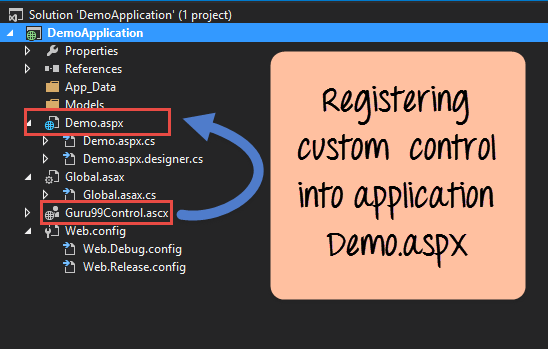
Let’s look at how we can achieve this. The below steps are a continuation to the previous section. In the previous section, we have created our custom control. In this section, we will use the control in our Demo.aspx web form.
First, we will register our custom ‘control’ into the Demo.aspx file.
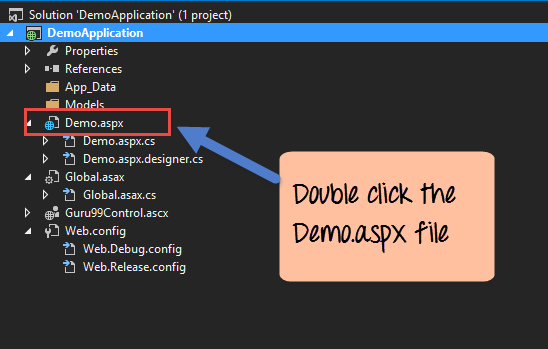
Step 1) Ensure that you are working on the demo.aspx file. It is in this file that the web user control will be registered. This can be done by double-clicking the demo.aspx file in the Solution explorer of your .Net solution.
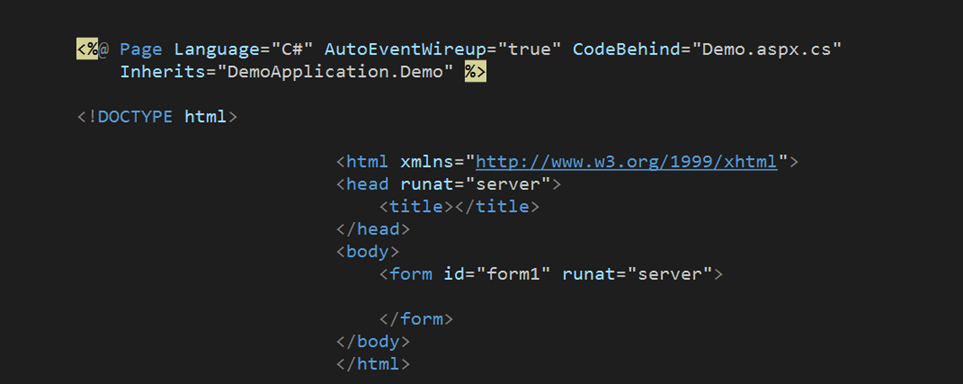
Once you double click the form, you will probably see the below code in the form. This is the default code added by Visual Studio when a web form is added to an ASP.Net project.
The default code consists of steps, which are required to ensure that the form can run as an ASP.Net web form in the browser.
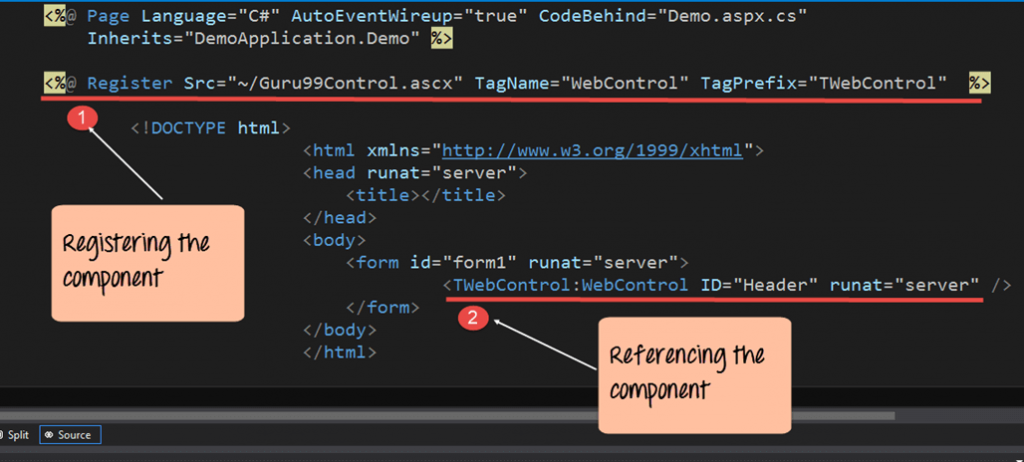
Step 2) Now let’s add our code to register the user control. The screenshot below shows registration of the user control to the above basic code.
<%@ Page Language="C#" AutoEventWireup="true" CodeBehind="Demo.aspx.cs" Inherits="DemoApplication.Demo" %>
<%@ Register Src="~/Guru99Control.ascx" TagName="WebControl" TagPrefix="TWebControl"%>

<!DOCTYPE html>
	<html xmlns="http://www.w3.ore/1999/xhtml">
	<head runat="server">
		<title></title>
	</head>
<body>
	<form id="forml" runat="server”>
		<TWebControl:WebControl ID="Header" runat="server" />
	</form>
</body>
</html>
Code Explanation:-
- The first step is to register the web user control. This comprises of the below basic parameters
- The ‘Register’ keyword is used to register the web user control.
- The src parameter is used to define the name of the control, which in our case is Guru99Control.ascx.
- The tagname and Tagprefix are individual names given to the control. This is done so that they can references in HTML pages as a normal HTML control.
- Next, we reference our Web user control via the TagPrefix:TagName which was assigned earlier. The TagPrefix:TagName is an indicator that we want to use our custom web control. When the page is processed by the web server, you can see we have used the TWebControl:WebControl tag. It will then process the ‘Guru99Control’ accordingly.In our example, it is TWebControl:WebControl.
- An optional ID is given to the control of “Header”. It’s generally a good practice to give an ID to an HTML control.
- Finally, the runat=server attribute so that the control will run on the web server. For all ASP.Net controls, this is the default attribute. All ASP.Net controls (including custom controls) have to be run on the server. Their output is then sent from the server to the client and displayed in the browser accordingly.
When the above code is set, and the project is executed using Visual Studio. You will get the below output.
Output:-
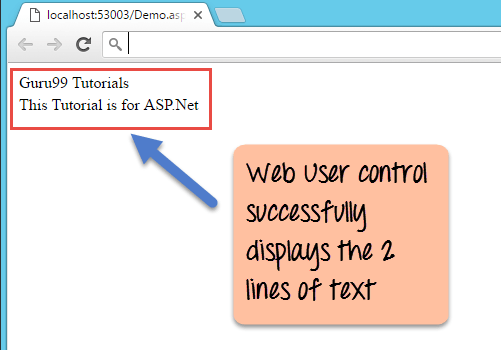
The output message displayed in the browser shows that the web user control was successfully executed.
Registering asp.net controls globally in the web config configuration file asp
Sometimes one might want to use user controls in multiple pages in a .Net application. At this point, you don’t want to keep on registering user controls on each and every ASP.Net page.
- In .Net you can carry out the registration in the ‘web.config’ file.
- The web.config file is a common configuration file used by all web pages in .Net project.
- It contains necessary configuration details for the ASP.Net web project. For example, one common configuration in the web.config file is the target framework parameter.
- This parameter is used to identify the .Net framework version used by the application.
Below is a snapshot of the default code in the web.config file. The highlighted part is the target framework part.
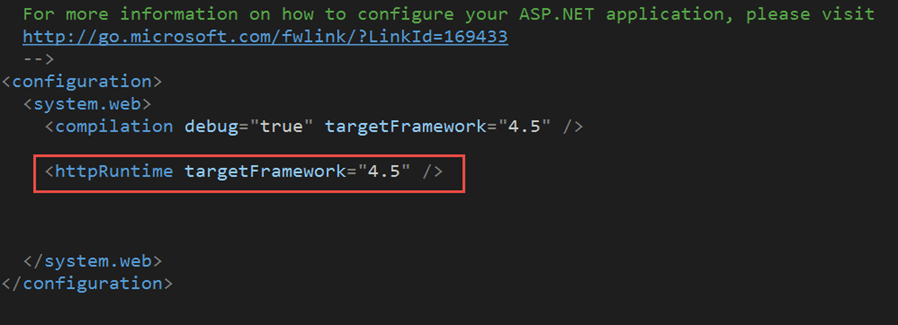
Let’s see how we can register our Guru99Control in the web.config file.
Step 1) Open the web.config file from solution explorer by double-clicking the file.
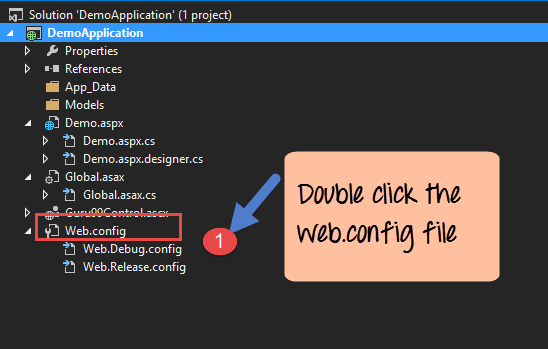
When you open the web.config file, you might see the below configuration. The ‘web.config’ is added automatically by Visual Studio when the project is created. This is the basic configuration required to make the ASP.Net project work properly.

Step 2) Now let’s register our component in the web.config file. We need to add the below lines for that.
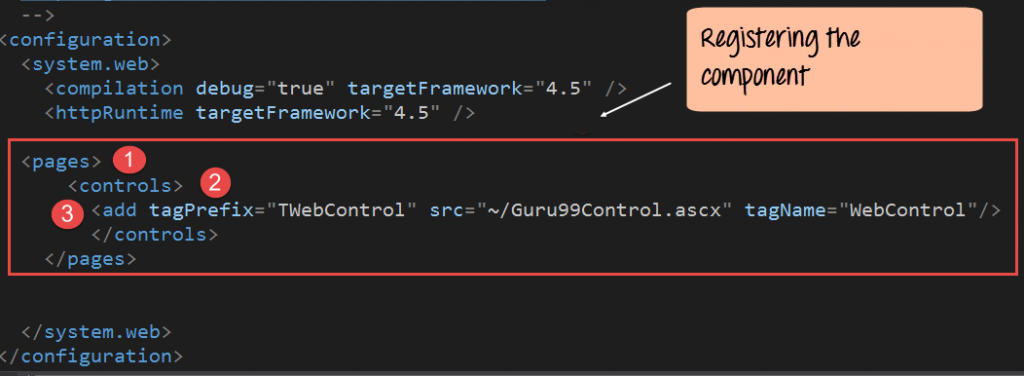
<configuration>
	<system.web>
	 <compilation debug="true" targetFramework="4.5" />
	<pages>
		<controls>
		 <add tagPrefix="TWebControl" src ="~/Guru99Control.ascx" tagName="WebControl"/>
		</controls>
	</pages>
	</system.web>
</configuration>
The registration comprises of the below substeps
- Add a tag called <pages>. It means all the configuration for the controls will be applicable to all the ASP.Net pages in the solution.
- The <controls> tag means that you are adding a configuration for the user control.
- Then we register the user control with the additional tag. The remaining parameters of tagPrefix, tagName and src remain the same as before.
Step 3) Remember to go the ‘demo.aspx’ page and remove the lines for control, which had the registration of the Guru99 component. If you don’t perform this step, then the ‘Guru99Control.ascx’ a file will be executed from the ‘demo.aspx’ file instead of ‘web.config’ file.

<%@ Page Language="C#" AutoEventWireup="true" CodeBehind="Demo.aspx.cs" Inherits="DemoApplication.Demo" %>
<%@ Register Src="~/Guru99Control.ascx" TagName="WebControl" TagPrefix="TWebControl"%>

<!DOCTYPE html>
<html xmlns="http://www.w3.ore/1999/xhtml">
	<head runat="server">
	  <title></title>
	</head>
<body>
	<form id="form1" runat="server”>
	  <TWebControl:WebControl ID="Header" runat="server" />
	</form>
</body>
</html>
The above code is set, and the project is executed using Visual Studio. You will get the below output.
Output:-
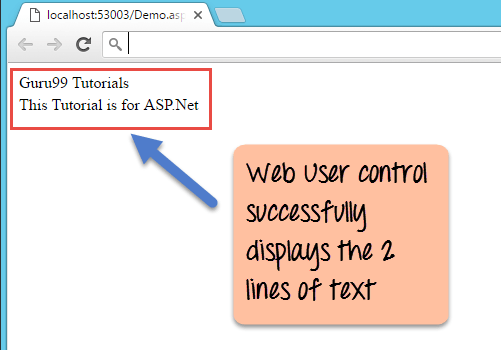
The output message shows that the web user control was successfully executed.
Adding public properties to a web control
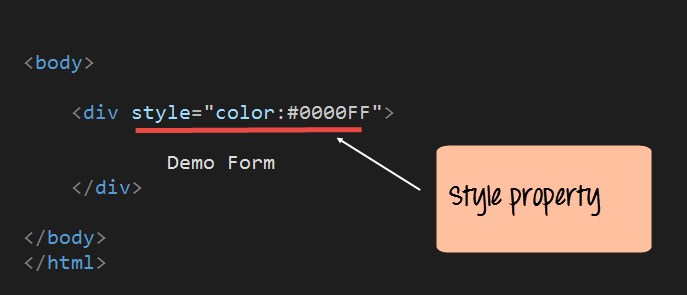
A property is a key-value pair associated with any control. Let’s take an example of the simple <div> HTML tag. A screenshot of how the tag looks like is shown below.
<html>
<body>
	<div style="color:#0000FF">

		Demo Form

	</div>

<body>
</html>
The ‘div’ tag is used to create a section in an HTML document. The ‘div’ tag has a property called a style property. This can be used to give a different style to the text displayed in the div tag. Normally you would see the code for the div tag as shown below.
<div style=”color:#0000FF”>
So the color attribute is nothing but a key-value pair which gives more information on the tag itself. In the above case, the key name is ‘style’ and the key value is ‘color:#0000FF’.
Similarly, for user controls, you can create your own properties that describe the control.
Let’s take a simple example and build upon our ‘Guru99Control’ created in the earlier sections.
In our example, we are going to add a simple integer property called MinValue. This value would represent the minimum number of characters in the text displayed in the user control.
Let’s carry out the below-mentioned steps to get this in place.
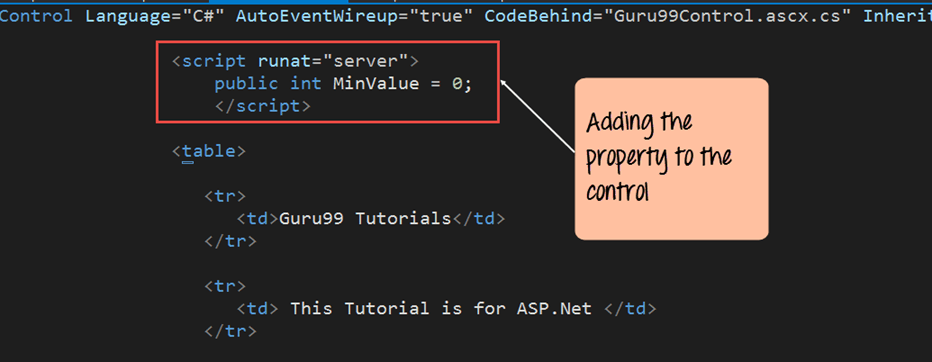
Step 1) Open the Guru99Control.ascx file. Add the code for adding the MinValue property.
<%@ Page Language="C#" AutoEventWireup="true" CodeBehind="Demo.aspx.cs" Inherits="DemoApplication.Demo" %>

	<script runat="server">
	  public int MinValue = 0;
	</script>

<table>
	<tr>
	  <td>Guru99 Tutorials</td>
	</tr>

	<tr>
	  <td> This Tutorial is for
	</tr>
</table>
Code Explanation:-
The script runat=server attribute is used to indicate that we are adding some.Net specific code and that it needs to be run on the web server.
This is required for processing any property added to the user control. We then add our property MinValue and give it a default value of 0.
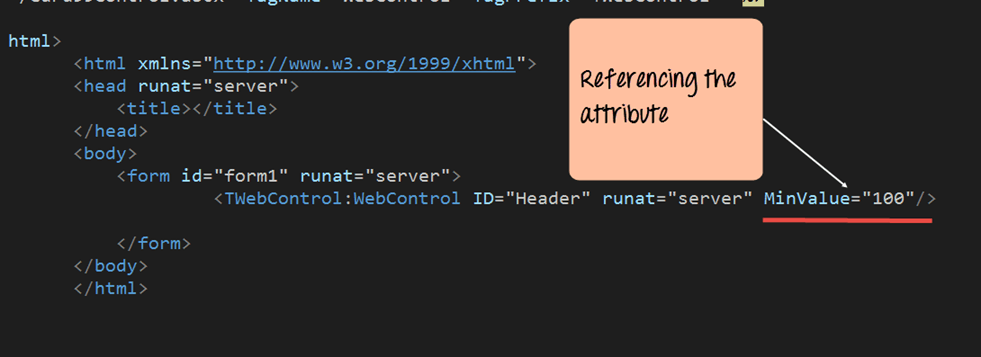
Step 2) Now let’s reference this property in our demo.aspx file. All we are doing now is just referencing the MinValue property and assigning a new value of 100.
!DOCTYPE html>
<html xmlns="http://www.w3.ore/1999/xhtml">
	<head runat="server">
	  <title></title>
	</head>
<body>
	<form id="form1" runat="server”>
	  <TWebControl:WebControl ID="Header" runat="server" MinValue="100"/>
	</form>
</body>
</html>
NOTE: – When you run this code, it will not show any output. This is because the output falls under 100 character limit.
Summary
- ASP.Net has the ability to create user controls. User controls are used to have code which is used multiple times in an application. The user control can then be reused across the application.
- The user control needs to be registered on the ASP.Net page before it can be used.
- To use user control across all pages in an application, register it into the web.config file.
- Properties can also be added to a web user control.