Before 20 years, the websites are developed with text and static HTML only. But as technology is growing we have lots of new ways to create any complex to simple website. There are so many options available to develop user friendly website.
Over last 10 years, people are having a modern websites with so many features and functionalities and this is only because of the open source CMS WordPress. Developing the website in WordPress is simple and easy process. You need to just install the WordPress and select the right theme and required plugins.
Still we can find there are so many static HTML websites needs to upgrade into WordPress theme. These types of websites are not upgraded because of the site owners may don’t want to change their content or they want to keep their site simple.
But the actually reason of not to upgrade the website into WordPress is they don’t know how to convert HTML site to WordPress site. And, they don’t know who can provide HTML to WordPress conversion service without affecting their content and page formatting.
There are so many ways to solve this problem. Below are 5 steps that we are using to convert HTML template to WordPress theme.
To manually convert static HTML website to WordPress without losing your content and design, you need to just create your own custom theme. In this process, you need to do some basic things like copy and paste and create some files and folders and then just upload the final version.
Use Sublime or Notepad++ to access the directory of your HTML site and the directory of your new WordPress site.
Step 1: Files and Theme Folder Creation
First, you need to create a folder and write a proper name. You can keep this folder anywhere where you would like to keep and access easily.
Open the code editor, create below files and save them all in above created theme folder. Keep open all the files so you can edit those whenever needed.
style.css
index.php
header.php
sidebar.php
footer.php
Step 2: Copy Old CSS to New style.css
If you don’t want to change your design, copy your old CSS and add into new style.css file.
The beginning of your file will look like below.

Step 3: Cut and Paste your Current HTML
In your header.php file copy and paste everything from your current index.html site. Copy all of which are above the opening div class=”main” tag. Save header.php file and then close.
Second step is pick the complete aside class=”sidebar” tag from your index.html file. Copy and paste everything into previously created sidebar.php file. Save and close the file.
In third step, copy and paste everything after your sidebar class from index.html file into above created footer.php file. Save and close the file.
And last, select all remaining things from your index.html file, copy and paste them into your index.php file. Remember just save it and keep it open.
Now, close your index.html file and move to the next step.
Step 4: index.php Finalization
In this step, from newly created theme’s index.php file, call all the section, which we have added in other files.
Place the following code at top of your index.php file.

Place following lines at the very bottom of your index.php file.

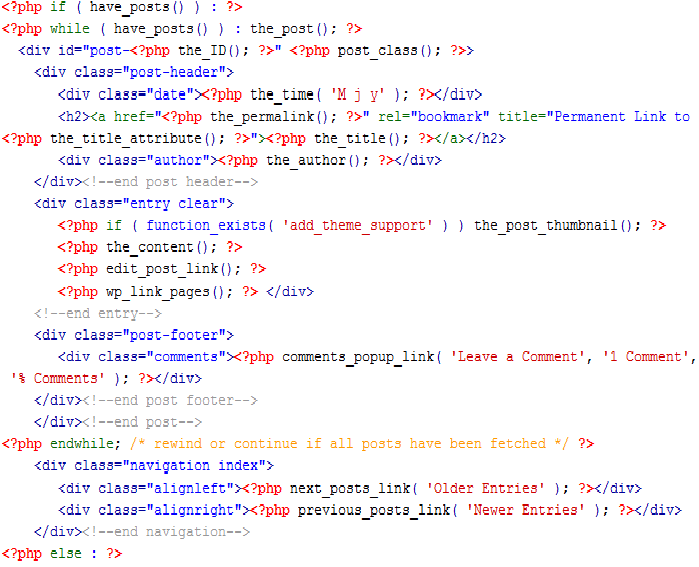
Now, we need to add some basic php code to display content to visitors. So, adding the below code to your new index.php file is your last step.

Finally, save and close your index.php file.
Step 5: Upload your new theme
Now open your installed WordPress directory and add your theme folder into /wp-content/themes/. Your new themes will appear in WP Admin > Appearance > Themes. Just activate it. At the end, release your new WordPress site with your old site’s content.
Use Ready made WordPress themes
There are so many ready-made WordPress themes available in WordPress marketplace. There are free and paid themes. You can select and choose which one is suitable and best for your business. There is a category wise filtration to find your perfect theme.
After selecting the theme, go back to WP admin and then Appearance > Themes and then Add New and install/activate the theme.
Now, see the preview of your site. You can see there is no content and without content your site looks boring. So, we need to add the content from your old websites.
You need to install the plugin called HTML Import 2. For that Go to WP Admin > Plugins > Add New and search for the plugin. After installing and activating the plugin, read the user guide.
Now, you have a new WordPress theme site with your old content and you feel that your website is looks better then the previous one.
Looking for WordPress hosting?
While choosing a new web host, make sure you don’t make the same common mistakes that most beginners do. A few of my favorite web hosts are ASPHostPortal, HostForLIFE, UKWindowsHostASP.NET. I recently reviewed ASPHostPortal and in my opinion, they’re the best shared host out there out of the large lot of hosts I’ve tested. If you’re curious as to why I never had to switch to another host since 2014, give my ASPHostPortal review a read.
A great place to look for a new web host is WebHostingTalk. Their members are very helpful and new members get proper guidance on choosing a web host.