To configure MySQL to SQL Server, you must create a link to the target instance of the SQL Server where you want to migrate the MySQL database or databases. The steps are straightforward but for the sake of explaining the technical terms that may likely be used during the configuration, the article will first talk about MySQL and the MySQL Server.
This post will guide you through all the essential steps to successfully create and configure MySQL to connect to the SQL server. Firstly, the article will briefly introduce MySQL and the SQL server and its distinctive features that made it important among programmers.
Introduction to MySQL
MySQL was developed by Michael Widenius and David Axmark in 1994 as an open-source, quick dependable, and adaptable relational database management system, used with PHP. It is a simple-to-use RDBMS popularly exploited by both small and large organizations. One of its distinctive features is its adaptability; the open-source GPL permit permits developers to alter the MySQL programming to accommodate their particular environment.
MySQL is turning out to be so mainstream due to numerous valid justifications:
- MySQL is delivered under an open-source license, which means you don’t have to pay to utilize it. This makes it popular among web developers.
- It is an incredible program by its own doing. It handles an enormous subset of the functions of the most costly and amazing database packages.
- It likewise utilizes a standard type of the notable SQL data language.
- MySQL can be used with any operating system and with numerous language like PHP, C, PERL, Java, C++, and so on
- MySQL works rapidly and functions admirably even with huge data sets.
- MySQL is the most loved database for web development.
MySQL also uses enormous data sets, up to 50 million rows and columns or more in a table. The default document size limit for a table is 4GB, however, you can build this (if your operating system can deal with it) to a hypothetical restriction of 8 million terabytes (TB).
Some of the top brands around the world utilize the MySQL database and they include Facebook, Wikipedia, Google (not for search), YouTube, and Flickr. Content Management Systems (CMS) like WordPress, Drupal, Joomla, phpBB etc. A huge number of website developers around the world are also using MySQL to design web applications.
Key Features of MySQL
- MySQL server has a multi-layered design with independent modules.
- It is fully multithreaded with kernel threads. This makes it perfect for handling several CPUs if they are available.
- It provides both transactional and non-transactional storage engines.
- It has a high-speed thread-based memory allocation system.
- It supports an in-memory heap table.
- It also handles large databases.
- It works in client/server or embedded systems.
- MySQL also works on many different platforms.
Why Move From MySQL to SQL?
The reasons to move from MySQL to SQL are listed below:
Performance
According to the reports on a comparative study by IJARCCE, SQL has a better response time than MySQL. In the comparative test, the time was recorded on both the Databases for the execution of the same “SELECT”, “INSERT”, “DELETE”, and “UPDATE” queries. MySQL only performed better in the “INSERT” query.
Scalability
As the size and complexity of data increase, it becomes difficult to handle MySQL because errors may occur from time to time. It was not designed with scalability in mind. SQL, on the other hand, provides high scalability.
Security
DBAs can manipulate the Database files through binary execution at run time that makes MySQL vulnerable in terms of security. This is not the case with SQL, as doesn’t allow any Database file manipulation and also offers a Vulnerability Assessment tool (VA) that helps developers identify and fix security vulnerabilities.
Introduction to SQL Server
SQL Server is also an RDBMS created by Microsoft. However, it is fundamentally developed to compete with the MySQL database. Like MySQL, the SQL Server is exceptionally adaptable and can be run on anything from a personal computer, to a network of powerful cloud servers, and anything in the middle.
As indicated by Microsoft, SQL Server is the number one most-utilized data set on the planet. As per different sources, it’s more similar to numbers 2, 3, or 4. Regardless, it’s perhaps the most well-known DMS on the planet. While its center capacity is that of an RDBMS, SQL Server has gotten substantially more than that. SQL Server 2016 incorporates in-built business intelligence tools, just as a scope of analysis and reporting features. This is on top of the tools like data creation, backup, duplication, security, et cetera.
Key Features of SQL Server
- The Database Engine: This segment handles data storage, fast exchange processing, and data security.
- The SQL Server: This assistance begins, pauses, stops, and continues the dataset process.
- The Server Agent: It plays out the job of the task scheduler. It tends to be set off by any occasion or according to request.
- The SQL Server Browser: This receives approaching queries and connects with the ideal SQL server instance.
- The SQL Server Full-Text Search: This permits the client to run a full-text search against Character information in SQL Tables.
- SQL Server VSS Writer: This permits data backup and rebuilding of the data file when the server isn’t running.
- The SQL Server Analysis Services (SSAS): Offers Data analytics, Data mining, and Machine Learning features. The SQL server is incorporated with R and Python language for cutting-edge data analytics.
- The SQL Server Reporting Services (SSRS): Offers data reporting features and dynamic capacities using Hadoop integration.
- The SQL Server Integration Services (SSIS): Offers extract-transform and Load features of the distinctive kind of data starting with one source then onto the next. It very well may be seen as converting raw data into helpful ones.
Using ODBC to Connect MySQL to SQL Server
In this method, ODBC will be used to connect MySQL to SQL Server. ODBC stands for Open Database Connectivity (Connector). It was developed by Microsoft in the 1990s. Commonly, that is API (Application Programming Interface) for retrieving database systems.
This section will be divided into three parts:
Step 1: ODBC Driver Installation
Before you install the ODBC driver, you need to first make sure that you have updated the Microsoft Data Access Components (MDAC) and it’s up to date. Likewise, ensure that the Microsoft Visual C++ 2013 Redistributable Package is pre-installed on your computer.
Ensure that you pick the right version that works with your system; either 64 bits or 32 bits depending on your computer compatibility.
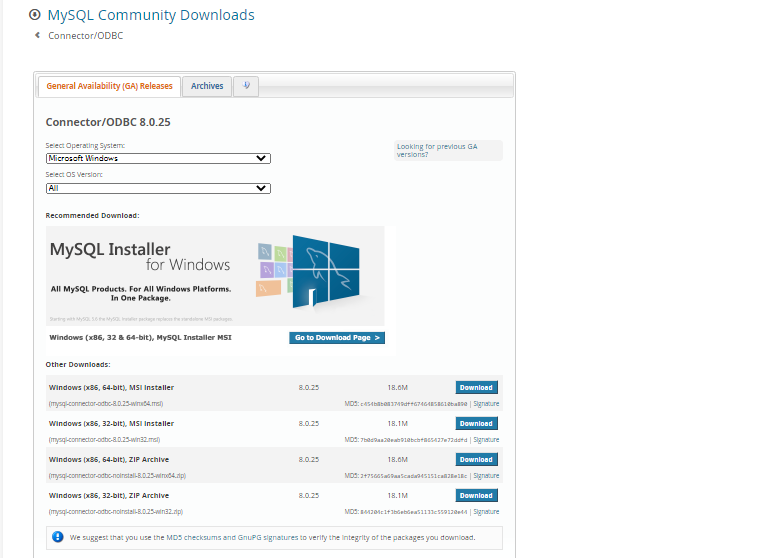
After downloading, the next thing to do is locate the file and install it. After a couple of minutes, the installation of the ODBC driver for MySQL should be completed. You can check the control panel of your computer to confirm that the driver is installed on your computer.
Step 2: ODBC Driver Configuration
The next step is to connect to the MySQL database via the ODBC driver. In the ODBC Data Source Administrator dialog, press the Add button. You will find it under the System DSN tab.

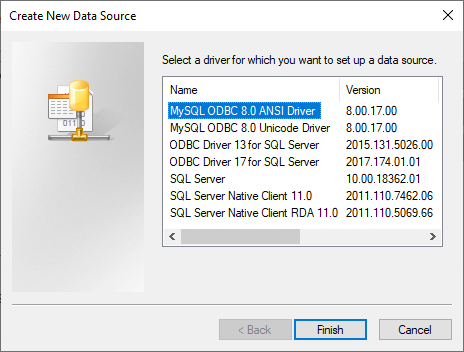
After clicking the Add button, a Create New Data Source dialog opens. Proceed to select the MySQL Driver and then press finish.
In the ODBC Data Source/ MySQL Connector Configuration dialog:
In the Data Source Name section, enter any data source name you want. The next thing is to add a description to the data source if necessary.
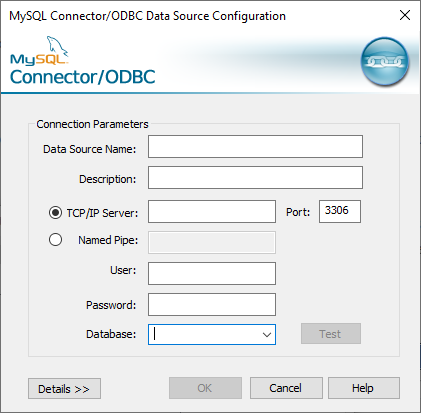
Utilize the Named Pipe Connection or TCP/IP Server method to interface with MySQL by choosing a suitable radio button. In this model below, the TCP/IP Server radio button is chosen. In the content box, input a hostname or IP address of the MySQL server. As a matter of course, the hostname is localhost and the IP address is 127.0.0.1. Next is to enter the TCP/IP port on which the MySQL server is listed in the Port box. It displays 3306 ports by default.
In the userbox, input the name of the client expected to connect with the MySQL database and type a password in the password box. Under the Database combo box, pick the database for which you need to build up a connection:
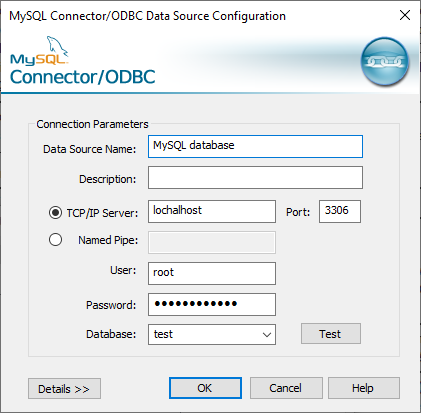
After inputting all of this information, you can test the database by clicking the Text button and make sure it shows testing successfully.
When you are done, the data source name should appear in the System DSN tab of the ODBC Data Source Administrator dialog:

Step 3: Creating a Linked Server using ODBC Driver
At this point, you should have already installed your ODBC driver for MySQL and also connected the driver to the MySQL database you want. The next phase is to configure the linked server in SSMS (SQL Server Metadata Explorer) to connect. With the SSMA, you can collect metadata about every database in SQL Server instance and display this metadata in the SSMA.
The next step is to go to the SSMS, in the Object Explorer, under the Server Objects folder, right-click on the Linked Server folder and, from the menu, select the New Linked Server choice:
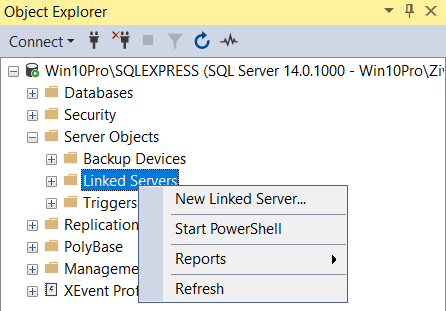
This displays the New Linked Server dialog. You will then need to configure it to connect to the MySQL Server.
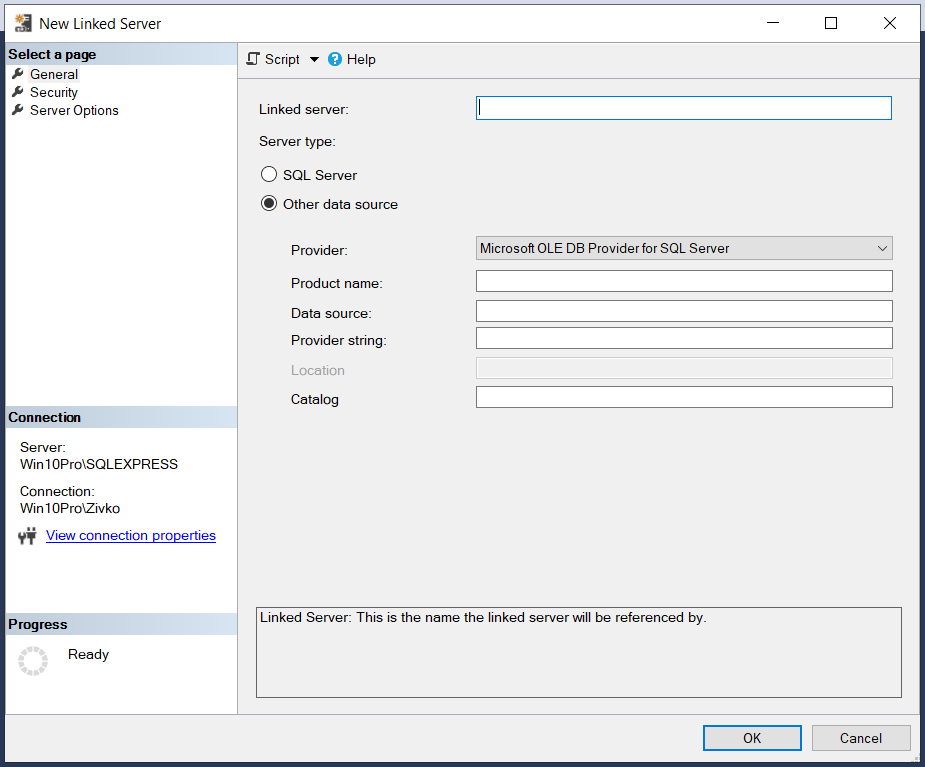
While in the Linked Server dialog box, click the General tab on the left-hand side and enter the name you want to use to call the linked server. It could be anything as long as it’s easier to remember.
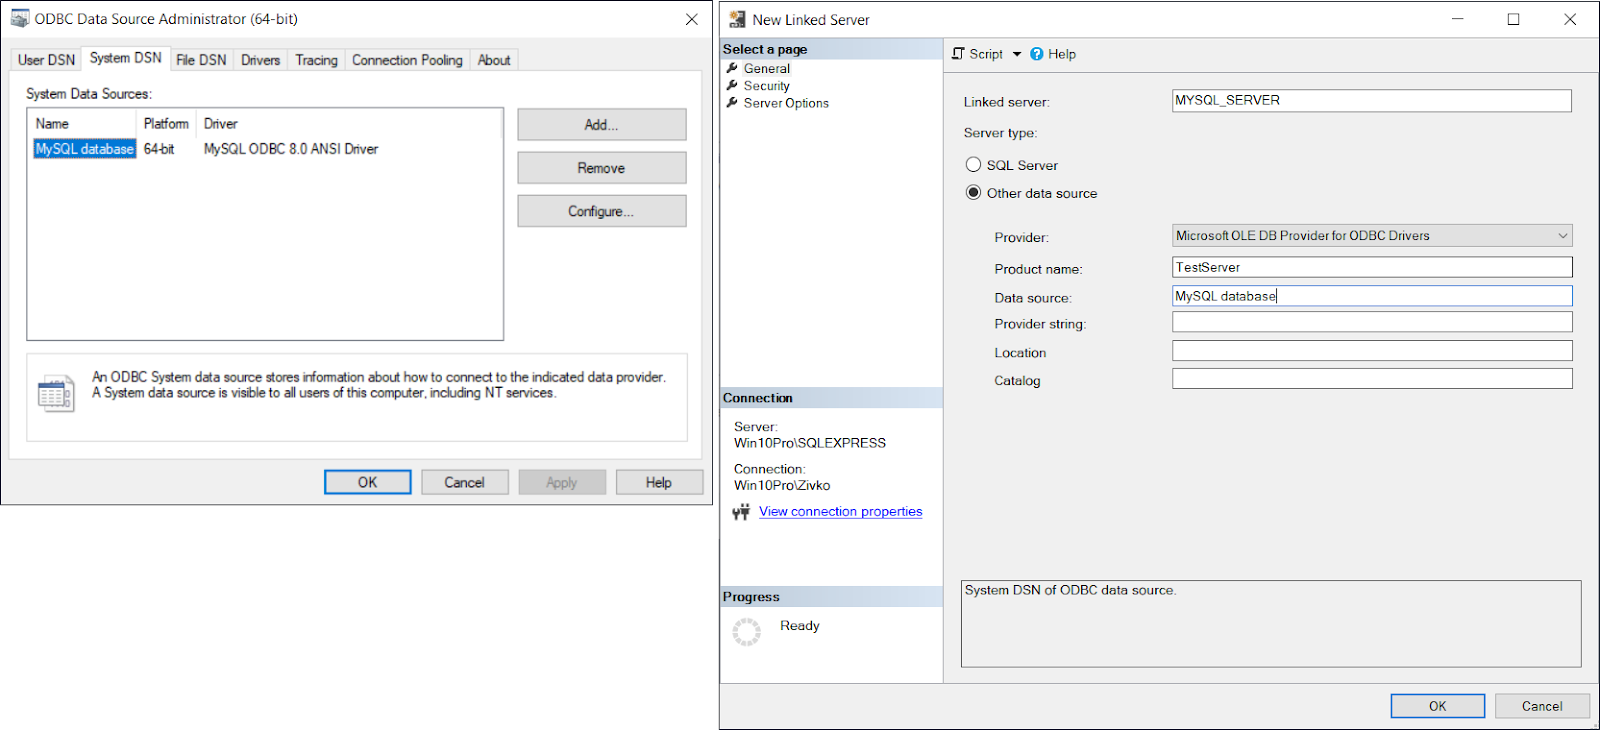
Then choose the other data source button from the server type. Under it, you will find a provider; select the Microsoft OLE DB Provider for ODBC Drivers option.
Then proceed to enter any proper name. In the Data source, the name of the ODBC data source should be entered:
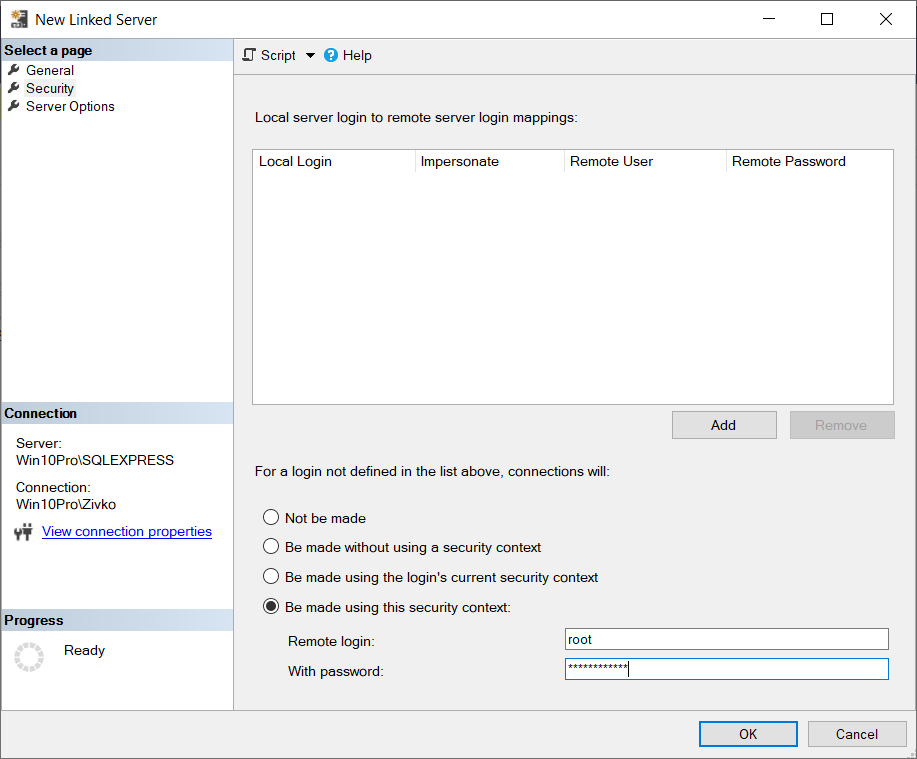
Then on the Security tab, click the Be made using this security context radio button and in the Remote login and With password boxes, enter the user name and password that exist in the MySQL Server instance, that is chosen as a data source:
Under the Server Options tab, set the RPC and RPC Out fields to True:

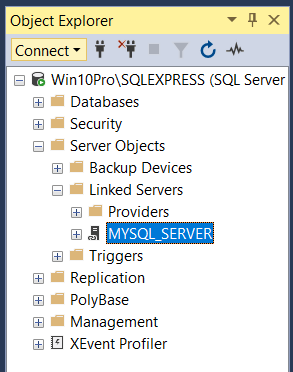
After setting all the options on the New Linked Server dialog, click the OK button. The newly created Linked Server ought to appear in the Linked Servers folder:
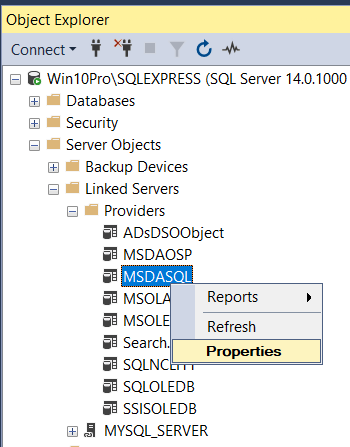
Before starting to querying data from the MySQL database, go to the Providers folder under the Linked Server folder, right-click on the MSDASQL provider and, from the context menu, choose the Properties command:
In the Provider Options dialog, check the Nested queries, Level zero only, Allow in process, Support ‘Like’ operator checkboxes:

This concludes this method of connecting MySQL to SQL Server that used ODBC.
Challenges of Manually Migrating Data from MySQL to SQL Server
The following errors might appear in the process of migrating data from MySQL to SQL Server while leveraging ODBC:
- Before you attempt to connect MySQL to SQL Server, ensure that the version of SQL Server is running and can accept new connections.
- If the Linked Server was created with the Allow in-process option enabled, then you should delete this Linked Server and create it again with the Allow in-process option disabled.
- While setting up, you need to set the RPC and RPC Out fields to True. In case when these two options are not set to true, you may get an error.
- An error message may also appear if the Allow in-process check box is unchecked when executing code.